We busted out some serious work this weekend. I'm going to let the pictures do most of the talking for the primer part, but there are plenty of other things that will let me ramble endlessly, as is my custom.
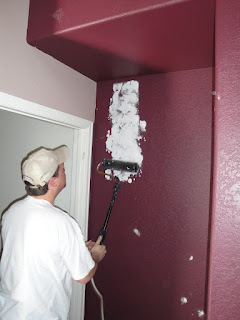
The tool being used here is a Wagner Power Roller. It hooks onto a 1-gal bucket of paint and pumps the paint to a special roller so you don't have to keep reloading in a tray. It is simply amazing. It works great for large areas but the cleanup takes long enough that it isn't worth it unless you're painting a lot. Some reviews I've read have been pretty negative, but we had an awesome experience with it. Here's the link: Wagner Power Roller
Yes, that is my friend and my dad working while I'm taking pictures. I'm sort of a jerk. But look at how much better the place looks without that nasty red/purple up there. Our neutral color (visible on the wall in the pic with my dad in it) looked sort of yellow and lame in that room but looked great in other rooms. We tried it even over multiple coats of primer and with multiple coats of color and it just kept looking awful. Turns out it was the reflected light from the other walls, and once we got the primer on all the walls it looked great. I'm really glad we did that test again after priming because we were ready to go with a different color entirely just because it looked so awful in this room. Let that be a lesson to you: You can't get a good feel for a color on your walls if you already have a dark/super bright color on the other walls. Prime it up, then use your little samples. Here are the other rooms in no particular order:
Okay, this might require some explanation. The power roller pumps paint when you have your finger on the button. It stops when you let up. It pumps more paint than you can lay down if you keep your finger on it, so you need to let off and just roll the roller dry before loading it up again. This process can be a bit touchy so it was helpful for us to have me go around after my friend with a dry roller and just sort of smooth out the paint. I could homogenize the coverage a bit, and pick up any stray drips or lines or anything. It was still way faster than two of us using trays and regular rollers, and we got a great layer of primer on here.
Me in my overalls. I do love these things. I managed not to get paint all over them, which was nice. They got super dirty later on when I was cutting holes in the basement ceiling.
This is my tiny wife in her house-cleaning duds. She was cleaning and scrubbing and scraping all day making everything ready for paint. She's such a good worker! Also, she's very cute.
So close to being done now!
This was the last room. The whole house has a different feel to it, even with just the primer up and without us having done any cutting in on the edges. It just feels brighter and cleaner somehow. We'll be getting more color on the walls soon, too. I'll take lots of pictures of that and then we can do some comparisons with the original colors and see what you guys think.
We did some other projects this weekend, too.
Took off the wallpaper borders in the kitchen/family room area.
Prepped the rest of the rooms for paint (took down all the blinds as part of that).
And here's a little gem. I can't find a picture of it right now, but the light switch in the orange room was supposed to be a two-switch plate like the rest of the rooms. Someone had moved one switch the the middle and puttied around it but we couldn't figure out why. We didn't worry too much about it until yesterday when we started digging it all out. My dad shipped the putty away and found popsicle sticks used as a base for the putty, and then this underneath:
The other switch is still inside the box, turned sideways. He added metal plates to the top and bottom of the box so he could mount the remaining switch sort of towards the middle. It makes no sense, especially since the switch he folded inside was still perfectly functional. Here are some more pictures of this disaster:
He actually used a nut and small bolt to hold the remaining switch to the metal plates he installed.
Here's the other switch tucked into the box. He has to fold down the mounting brackets to get it to fit.
Both switches pulled out. What the heck? No idea, but I know we'll be replacing that switch and mounting both switches back in their appropriate places.
Here's the progress made on the never-ending AV project:
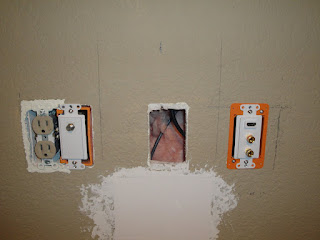
If you see the two long vertical lines to the right and left of the center box (with the wires) those are the lines where the rear plate of the TV swing arm structure will be. I have to move the other box over to the right (where it's drawn now) so that it will be between the swing arm structure and the next stud.
New hole with the wires pulled through. I'm going to have to patch that middle one now.
This is the plate that goes on the right. HDMI port on top, center channel speaker ports on the bottom. Very nicely set up, I think.
Here's the back. The connectors for the speaker wires are a little odd, but they seem solid. There are little gold screws in the side, so you unscrew them, put the wire in and then screw them back down. Seems like it will be secure enough, I guess.
This is one of our magical orange boxes. These things are great. The little swing arms go up and down and when you tighten the screws they clamp to the drywall. They're perfect for what we're doing here and are so easy to use.
Here's an example of me thinking ahead. I drilled a hole in here. You'll see why in a second.
There it is! I used a cable tie to attach the HDMI cable to the box so it can't pull free of the connecter and get lost back behind the wall. The speaker wires and the coax screw in but the HDMI just pushes in so I wanted to secure it a bit better.
Here it is clamped to the wall. Very nice, isn't it?
This is how the speaker wires connect. I haven't seen these before, but who am I to judge?
All the plugs plugged in. Time to secure to the wall and be done with it for the time being. You can see that the HDMI cable is attached to the box at the bottom even though it plugs into the top. Part of thep lan is to give the wire enough slack on the back that it won't get pulled out by any rough treatment of the cables down below or anything. Also, I didn't want to crimp it too hard to get it to plug in properly.
Ta-da! There's the plug. After all this, it feels way more impressive to me than it looks. Still, once we get the other speaker panels finished and the remaining holes patched, we'll be all done. Woot!
So pretty. What to do about the double gang panel on the left, though? We couldn't find a white panel that had a two-hole outlet opening and a rectangular opening. Solution?
They painted over the outlet so we needed a new one anyway. This just makes the whole thing look all snazzy.
Thanks for reading! As always, feel free to ask questions or leave suggestions or whatever.
Monday, April 19, 2010
Subscribe to:
Post Comments (Atom)


I must be very careful never to let Chris see this. He is not a handy person, if I may be so bold as to assert that. But he does like to THINK that he's able to accomplish major acts of audiovisual wiring. And then things happen like holes being cut from the inside to the garage. Or wire dropping from the center of the ceiling. Or how our remote turns off all of the lights in the living room when you turn off the TV...
ReplyDeleteI wasn't always a handy person either, but a little poking around and some experimentation can teach you a lot. We're going to be running co-ax and Cat-5 cables to all the bedrooms, and we'll have internet in every room on the main floor and in the basement as well. It's a lot to do but it's fun and isn't as hard as you'd think. It'll also be really nice for us since we're so tech-inclined.
ReplyDelete