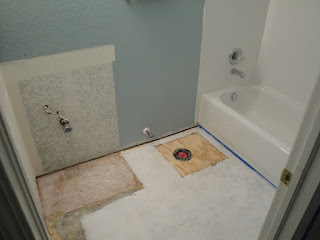
I've read a lot and watched a lot of videos on how to lay tile. I know the process in an academic way, but haven't actually done it so there's a certain disconnect. Yes I know you have to mix the mortar, but what is your desired consistency? How do you know when you've reached it? I'm learning these things now, because we finally got started on the tile project for the hall bath. Here's where we started last night:
The toilet and vanity have been removed, the moldy bit got patched and we plugged the drain properly.
Here I am in the back yard mixing up the mortar. Yes, those are my underpants. They will be featured prominently in this post. Please escort young children and seniors from the room before continuing. This is why I bought those overalls. Also, notice the black bucket. That bucket was $1 at target and we are not planning on salvaging it. We had no idea how much mortar to mix so we figured we'd mix more than we needed and just let it harden in the bucket. Wasteful, yes, but until we get a better idea of how much to mix for a given area we wanted to err on the "too much" end. For reference, this is "Unmodified" mortar, so it's uber-cheap. You want to use unmodified mortar under the backer board and modified mortar under the tiles.
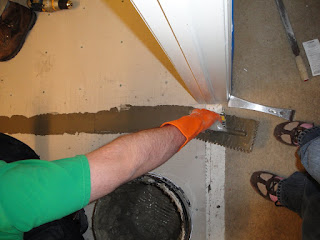
Using the 1/4"x1/4"x1/4" trowel to slap some mortar onto the floor here. These trowels have a toothed edge and a flat edge. The teeth are how you make sure you have the appropriate amount of mortar on the floor and the smooth edge is for spreading it around. You can also use it like a scoop to get it from the bucket to the floor.
I'm using the flat part to smooth the mortar out into the corners. it's a little tricky because the bottom is flat and smooth. With the consistency of the mortar, that means you can get some suction going if you lay it flat. keep a bit of an angle to it and you won't have any problems. A margin trowel would also be a bit useful here but you certainly don't need one.
You can see the grooves now. I got a decent layer of mortar down and started using the teeth to scrape off the excess. This ensure a nice even coat of mortar across your surface and it helps the backer board to stick to the floor. As the board settles, the ridges stick to the board and then sort of squish sideways into the grooves. You get a consistent layer and everything sticks nice and evenly.
Here we are laying the backer board into the space. Notice that it's already cut to shape. This is uber-important and I'm sorry I didn't get pictures of that process. You want to dry fit your backer board before you even think about mixing up mortar for it. Get all of your pieces laid into the room together and make sure everything will fit properly. After that, pull them back out, vacuum the floor and then you can mix your mortar. The backer board we used is Hardibacker, and it's supposed to be the easiest to work with. We had trouble with it the first time but it worked great the second day after a little research. We also used a carbide blade in a jigsaw to cut out our hole for the toilet drain and that worked like gangbusters.
The board is down and stuck to the floor and now we have to attach it even more with screws. Pay very close attention here: buy the special screws. Don't use some you have around the house, don't buy cheap drywall screws, buy the screws designed for your backer board. They are different and they will work better and hold stronger. They aren't even too much more expensive. If you get Hardibacker, it'll have a grid on the front with markings for where to put all the screws. You'll also want to put them around the edge, but you want to bring them in at least an inch so you don't break the board.
Lots and lots of screws to hold this baby down. Don't skimp on them. Having this piece solid will help to keep your tile stable and avoid cracks in the grout or even the tile itself.
The other side now. I'm standing on the one we just put down. Not sure if that's okay or not, but we don't really have a ton of options in a space this small. I'm thinking it will be okay, but I suppose we'll find out in the long run, eh?
Here's my dad and I bringing the other piece in.When you're dry fitting, you'll also want to make note of which pieces should go in first or second and if there are any tricks to get them to fit. We had to bow these pieces to get them under the door frame, and knowing that before we had mortar down made it easier to get them to fit properly the first time.
Here's a prime example of why you should measure twice and cut once. I mis-measured the distance to this vent opening so we had to cut the other end longer to fit and then patch this little piece here.
I filled the gap around the patch piece with mortar, first.
I flattened it out with the smooth side of the trowel next. You want to leave a fair bit on here, though. Just get it smooth.
Next, add your mesh tape. Make sure it's the mesh tape for concrete and not the mesh tape for drywall. They are different and the drywall stuff can't stand up to the mortar. You can use your fingers to get it to stick in here a bit.
Use the smooth end of the trowel to embed the mesh tape into the mortar. You want it pretty much covered with mortar so the mesh pattern isn't showing through. You shouldn't have to add any more, just smooth it down so it sinks into the layer you had on there already.
You can see how it should look on the left there. Not tons of mortar, just enough to cover up the tape. This should be a nice strong joint.
That's handy because it's exactly how you do your seams between sheets, too. Lay out a little bit of mortar along the seam, use the smooth side to press it down into the gap (if there is any) and then lay your tape into it.
And there's a nice easy seam. Keep in mind that you'll be covering this whole surface up with another 1/4" or so of mortar so slight imperfections aren't going to ruin anything. Just get it all flat and smooth as best you can.
So there you have it. That's how you can lay backer board. You don't have to do mortar underneath, really. We chose to because the floor was a little uneven and the edges of the floor patch were slightly rough. Adding this thin coat of mortar helps even out the subfloor surface so you get good contact from the backer board without any high or low spots. if your subfloor is flat and smooth and even, you can just screw the backer board to the subfloor without any mortar underneath. Honestly, this wasn't that tough and the mortar we used is super cheap (like $5 for a 50-pound bag) so I wouldn't be averse to doing it again. It may be overkill, but that's sort of how I roll. Please let me know if you have any questions. We'll be laying tile tonight!
Friday, April 30, 2010
Subscribe to:
Post Comments (Atom)


Well that floors not going anywhere. Hope we never have to tare that back out. lol!
ReplyDeleteYeah, it's pretty solid. I'm very glad we did the tile pattern we did. We're going to love it so much I don't think we're ever going to want to change it.
ReplyDelete