Tuesday, November 23, 2010

Pink Fluffy Clouds

Well, we had a lot going on this weekend. We worked most of the day and accomplished less than I'd have hoped. Thankfully, it was because we were going slowly and thinking things through properly, so we cleverly avoided some mistakes we nearly made.

First, we climbed up into the attic and moved the blown-in insulation away from the area of the ceiling that had to come down.

You can't see me because I'm wearing camouflage.

We pulled the other big ceiling pieces down as well.

Whee!

We cut the ceiling out into the bedroom the distance the wall will need to come, and actually took it to the next rafter. We'll have to put a small piece of drywall up here to close the gap, but it shouldn't be a big deal.

Now, on to building the end wall for the shower:

Remember that extra stud we'd put in as a nailing surface? yeah, we had to take that out again. My cousin Ed was very cool and called to let me know that we'd forgotten about creating a nailing surface for the drywall on either side. Whoops! So we pulled it out and built a channel that would give us plenty of space to attach drywall on either side. You can see our spacer at the bottom there, to make sure we had the right width.

There we go. Now we have a nice solid nailing surface for the new wall and for everything else. You can see an example of the way the builder had done it on the left. They used the same technique but only used small pieces of board to fill the gap.

Have to get rid of this fan, since it's right where our 2x6 header needs to go for the new wall.

All gone!

The new header in place. The little metal tie thing at the far end was going to make things difficult for us, so we notched the 2x6 to go around it.

Works like a charm.

now we put up the new 2x4 header for the wall and got it parallel to the wall we put up last week. Everything is actually looking pretty good as far as being square, level and plumb.

We saw online that reinforcing the end of a wall with three 2x4s is recommended. Wood is cheap and we like to overbuild things anyway, so on they went. We also spaced the studs to allow plenty of room in the middle to attach plumbing fixtures.

And there it is in place. This bathroom is really starting to come together now. having the two walls up is solidifying the vision I've had in my head of it, and that feels pretty amazing.

We stapled up some heavy plastic sheeting to end the day. Until next time, thanks for reading!

Friday, November 19, 2010

Mr. Homeowner, Put Up This Wall!

Last night we started rebuilding the bathroom walls, which is a pretty big step, obviously. We're using a few new tools, most notably the pneumatic framing nailer:

This thing is awesome. I think we'd have spent easily 3 times as long trying to build that wall without it and my hammering arm would be mush today. I also got to try out my new air compressor in a more normal sort of activity (previously I had only used it to blow out the sprinkler system) so that is also cool.

Where's this board going? Nowhere. This was our testing board for the nailer. It wasn't driving the nails all the way in at first, so we had to get it adjusted. What better way to test than to nail this tiny piece of wood in place with a dozen nails?

Here's our test fit for the bottom of the wall. Looks good!

This is our cutting station. We brought all the tools up to the master bedroom so we don't have to run up and down stairs a lot. We've also learned a hard lesson about measuring twice and cutting once so every single board has been measured by me and confirmed by my dad.

We made our frame and then tested it in the space to make sure it fit. It's tight. it's actually very tight. We had to tap it into place with a rubber mallet. This is kind of a pain, but it's also kind of good. I'd rather have it be too tight rather than too loose. I'm not afraid to whack this thing with a hammer to make it do my bidding.

Getting the studs placed. We cut the middle ones a little shorter just to make sure it would fit in, but we cut them a little shorter than they needed to be. Not a big deal, but I think we'll adjust that on the next wall.

Almost in place.

Ta-da! It's snug in there. We could almost just leave it be and we could drywall over it without even anchoring it to the walls or ceiling.

We did it anyway. What kind of guy would I be if I didn't use the power of compressed air to drive an unnecessary number of nails into my walls?

We added the corner piece, too. It will be there to hold the drywall on the corner when the time comes.

We also doubled up on the supports there in the middle. We're attaching a wall there and need a nailing surface.

So there you go. One wall built and another couple of bits prepped. We'll be working more on it soon, and should have the whole thing done by this weekend. Then the plumbers and electricians and HVAC guys will come in and do the rest of the work for us, so we can start hanging drywall. Woot! Thanks for reading!

Thursday, November 18, 2010

Supply and Demand

We're going to get to work building new walls tonight, but first we need some supplies. Specifically lumber. Coming right up!

Unloading the truck, just like usual...

Wait, what? Yeah, that's right. We figured out that we could make about 20 trips with a couple of boards each, risking the walls and ceilings long the way and doing a flight of stairs for each trip, or we could use the upstairs front windows to get the lumber upstairs with minimal effort.


Look how much happier this made us!

More pics tonight! Thanks for reading.

Thursday, November 11, 2010

Demolition Man

We managed to do a bit more demo last night, and we'll finish up the rest tonight. Here's what we got done:

Removing the remainder of these pipes. I wish I'd done this in the first place, but I really didn't know what to expect. Oh well.

I did get to use the handy removal tool for the first time, so that's cool.

It just snaps over the pipe, and then you squeeze it down towards the fitting.

Thusly.

Et voila. All set and ready to be re-used.

Bit of a leak from one of the caps I had installed incorrectly. A little more pressure to snap it down and the leak stopped instantly. Not my finest moment in plumbing, but a minor issue overall.

So you can see now that we have most of the rest of the framing taken out. The last bits are proving more difficult, but they too will bend to our will.

Soon: New Walls

Thanks for reading!

Wednesday, November 10, 2010

I Raked a Rake (Sung to the tune of 'I Dreamed a Dream')

No new pictures, since all my recent work has been done in near-total darkness. All I really did was to rake out the side yard where the big pile of bricks is. You remember this one, right?

Yeah, it's like that. So I cleared it out right before it snowed on us, which is good. Two very full garbage bags later and it looks much better. The weird thing is that I found a rake with my rake. An entire rake had been buried in debris to the point where I had no indication that it was under there. I have found a garage worth of tools in the back yard now. I also found a really mangled tilling thing, to boot. Coupled with the actual garbage (broken toys, empty bottles and cans, ribbons, broken pieces of plastic, damaged rubber balls, bottlecaps, and who knows what all else) it's sort of amazing there was room for any weeds. Our new puppy has a knack for finding this stuff. By which I mean, I thought I'd found all of it and I was so wrong it makes me feel like Mayor of Wrong-Town. She finds some new bit of debris on every trip into the yard, and there are a lot of trips into the yard.

Anyway, I'll try to get some pics of the cleared-out space today while it's still light so you can see the difference. Thanks for reading!

Monday, November 8, 2010

Take a load off

...to the dump. That's what we did this weekend. We ripped, tore, shredded, bashed, broke, and pried a bunch of trash out of the house and then hauled it all away. This may have been the biggest pile of junk we hauled away to date. Most of it was construction materials, too. We finally got rid of the front and back doors from where they had been waiting in the side yard until we had a load worthy of a trip to the dump. But that's the end of the story. We should start at the beginning. Or maybe the middle.

We cut the carpet and pad out o the hobby room first, since we knew we'd be tearing down the walls and making a big mess in there.

All the way down to bare floor. You really can't imagine how much nicer these rooms are with the carpet taken out. It's weird, but they smell, look, and feel nicer with the OSB flooring than with the carpet in them. Once we get some beautiful hardwood up in there, we'll be sitting very pretty indeed.

Hobby room: De-floored.

My dad, sweeping up. These rooms haven't been this clean since the house was built, I'm thinking.

Coming through the wall here. The sledge and the crow bar were our weapons of choice, while the axes languished in the background.

This stuff goes pretty quickly once you can just swing away.

Almost all of the drywall out. The tile wall came out really easily, actually. Once I got a good handhold, I could just pull it off in big chunks.

The first of the framing pieces to be removed. This is where it gets really serious.

Time to take out the tub, now. All this foam was plugging up the hole around the drains, so it had to be removed. Then I cut the pipes, taped them shut, and the tub came right out. Thankfully, it hadn't been glued down like I've seen suggested in some books.

Working to get ourselves some more space. Once these big framing pieces come down, it's going to feel much more like the room we want it to be.

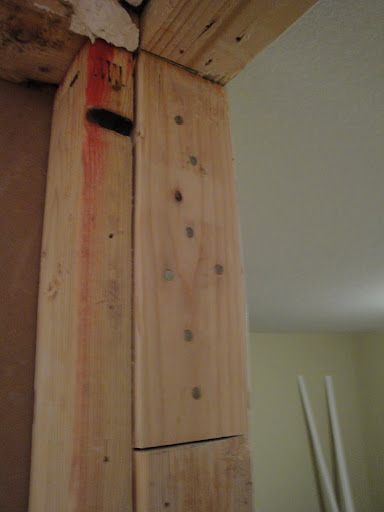
So close! You can see the water supply lines there where I'd capped them originally. In order to do the rest of the destruction/construction, we're going to have to cut them off much closer to the place where they enter the bathroom and cap them off there. Thankfully, these caps are reusable, which will be very helpful for future plumbing projects.

This is a bit weird, now. Just a giant hole of unfinished-ness in my otherwise finished house.

There we go. Now we have enough room to cut these off.

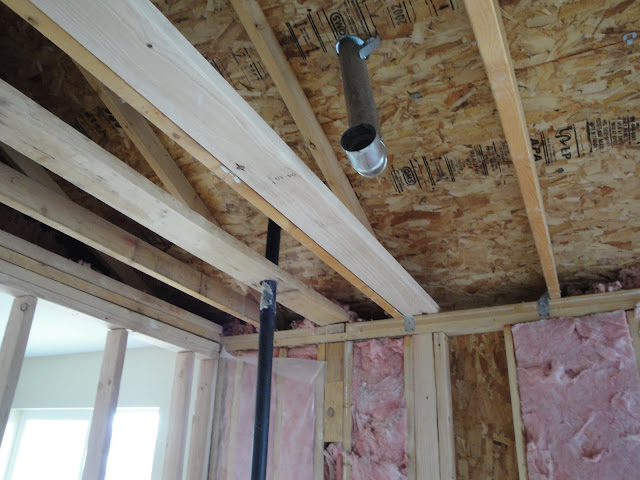
This is about as far as we got in here. We can't bring the ceiling down without raking the loose insulation away from this area in the attic, and we don't really need to do that yet. We'll get there soon enough, I'm sure.

For reference: The back side of the carpet in the master bedroom. It looks like an old pirate map. The stains in this carpet are even more impressive when you realize they have the upgraded, stain-proof carpet pad underneath. It has a layer of plastic on top so stains can't sink into the pad and then come back up again. All the stains on this carpet must have been spills that were just left without any attempts at cleanup. How many of these are urine? The world may never know.

I didn't realize just how bad these upstairs bedrooms smelled until we got the carpet out. There are still stains on the subfloor (Yes, through the carpet, through the stain-proof pad, somehow) and we'll be coating all of it with a healthy layer of Killz before we put down the hardwood. I'm simply amazed at the level of abuse this poor place suffered. I'm no Suzy Homemaker or anything, but just having giant puddles of fluid on every square inch of carpeted space in the house? That seems like something everyone can recognize as being bad.

Erick came over again and couldn't help but help, as is his custom. He showed us a really fast way to remove the tack strips. We'd been using our various tiny pry bars and such and it took a long time. he used the giant destructo-bar and it went so much more quickly.

This is my dad's truck, piled high with all our trash.

Yup. Gross. All of it goes to the dump.

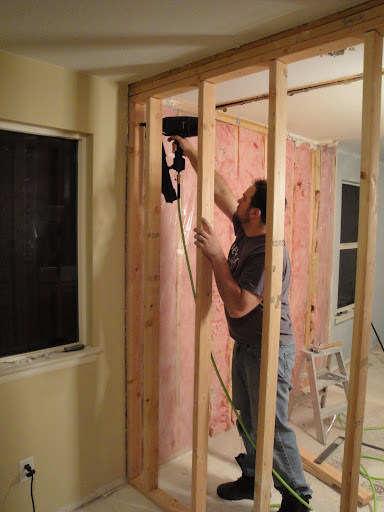
Anyway, that's all we have for now. We put some chalk lines down on the subfloor to mark the new walls, and we'll finish up with the demolition and start the new framing this week. Exciting times! Thanks for reading.