Here is our upstairs hall bathroom when we first moved in:
It's a bit dark because the electricity was off on our first trip and we didn't have the new camera yet. It isn't terrible at first glance, really. The walls are sort of boring, it has the towel rack above the toilet (I hate that) and the toilet is sort of bleh. It also turned out that the caulk in the tub was starting to deteriorate, the toilet wasn't functional, the floors were seriously damaged, and everything was just dirty. They also had those lame plastic valves on everything.
This room has been one of the main things we've wanted to get finished up. It's the bathroom we're currently using as the master, since the master needs to be torn out and re-done. We changed out the valves pretty early on, since they were prone to breaking. We also cleaned the heck out of it, re-caulked most of the seams, and replaced the floor, as you know. Here are some pictures of the other things we've done recently, and then how it looks as of today.
This is the blue color we painted in here. At first it seems kind of light, but as you add more bright white to the room is starts to feel very rich and beautiful. I like it a lot now.
And the tile. The grout has all dried to a really nice, consistent color now. It's lighter than we had thought it would be, but it isn't bad by any stretch.
Now, for the next big project. We need a toilet in here, stat!
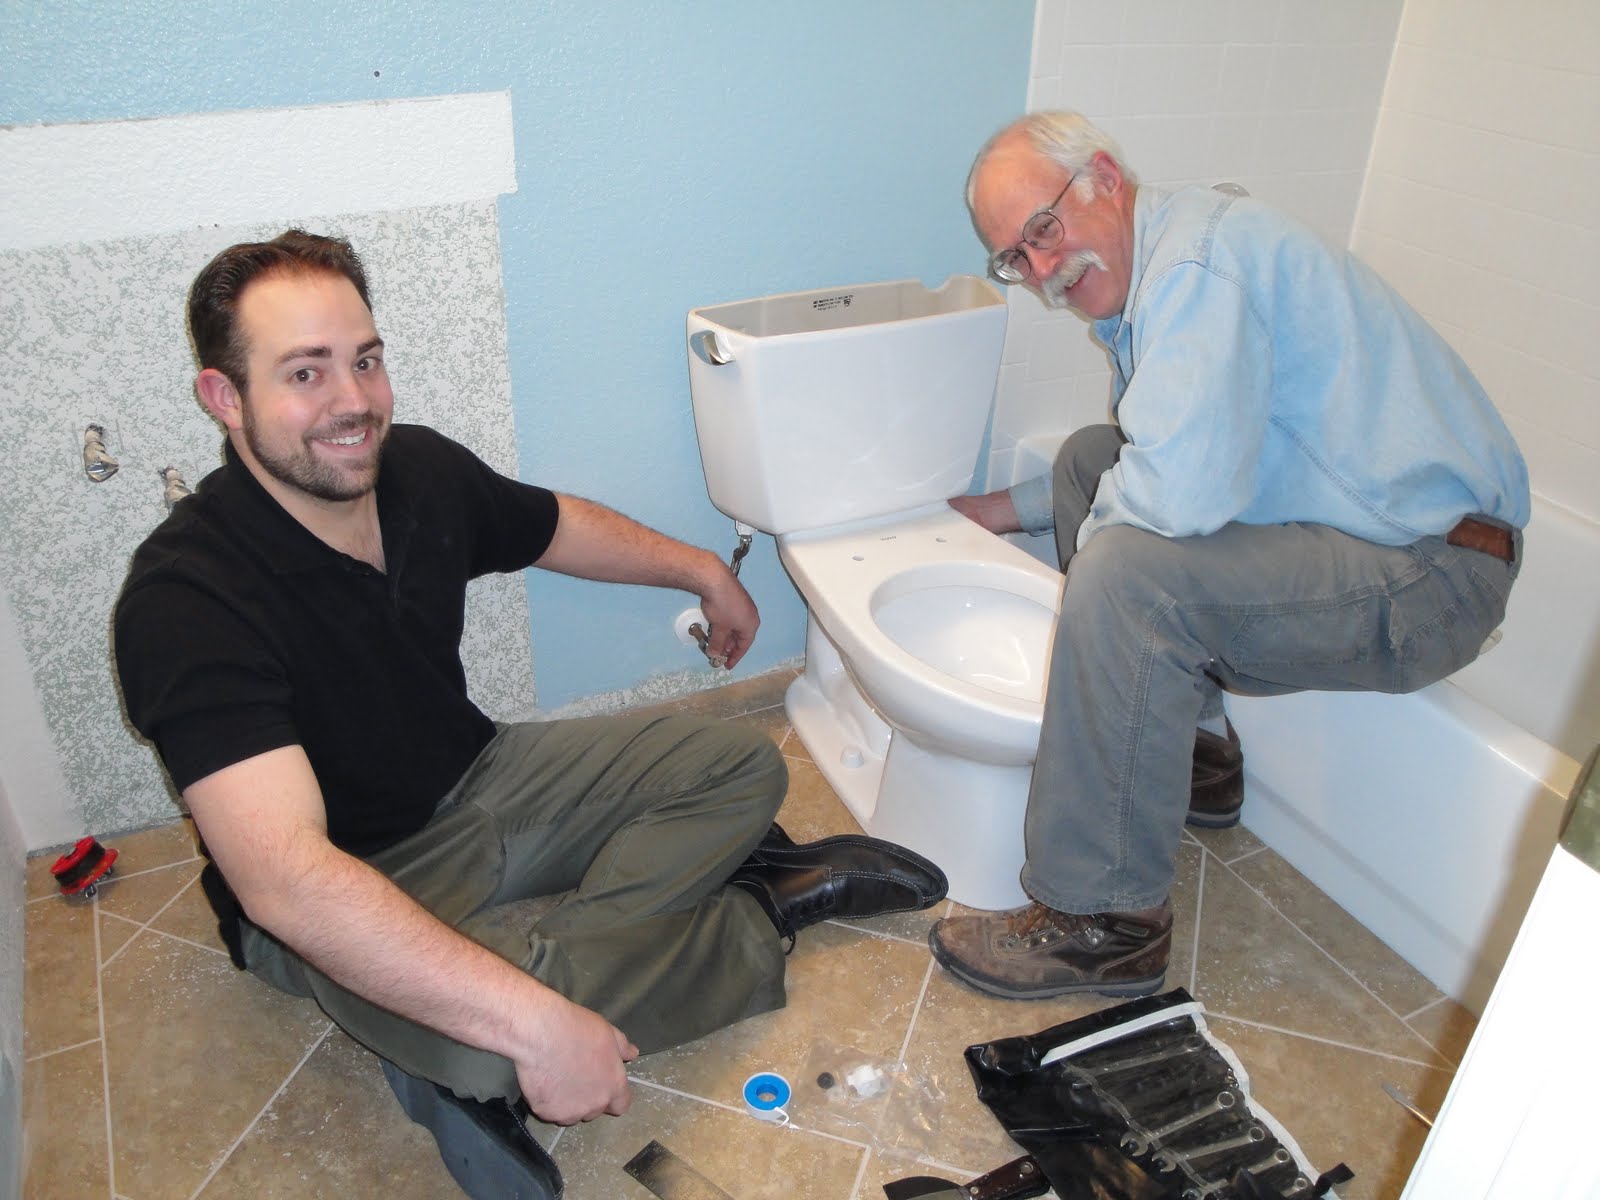
The toilet came in three boxes. The stool, the tank and the lid. It's a Toto Drake and it came highly recommended.

Unfortunately, we didn't get a lot of pictures of the process, but I can walk you through them. The first thing to do is to get the stool attached to the floor. This has two steps. One, you have to put on the wax ring. Two, you have to bolt it down. Something to confirm on your toilet flange is that the slots where the bolts sit will allow for the toilet to sit perpendicular to the wall. It's tough to explain without pictures, so I'll have to be better about it on the next one we do. Since we have tile, we also had to get two wax rings. Don't skimp here, they're cheap. We got one that was a mega-sized ring with the bolts in there, which was nice. That's like $6. The main ring will have a plastic flange on it that fits into the drain pipe. You need one of those, for sure. You also want to get another one that doesn't have the plastic flange. They're less than $2. You stick the two together on the bottom of the toilet (called the "horn") and then turn it over and line it up on the drain. You have to have the bolts set into the flange at this point, since you won't be able to fit them underneath later. Set the toilet down on the drain, with the bolts coming up through the two holes in the base. You'll notice that it sits up pretty high on those wax rings. You need to exert some firm, even pressure on the stool as you twist slightly back and forth. You're trying to mash those two wax rings together and to the floor and stool so you get a nice water-tight seal. It'll take a little doing, but that's okay. Now you can attach the washers and nuts to the floor bolts. Don't over-tighten as you can crack your tile or the toilet itself. You need it to be firm enough that you're not going to move it when you sit on it, but that's about it.
Now, you need to put on the tank. The most important thing is for it to be level. Get a little torpedo level and set it on the tank front to back. Slide the tank around (it'll have a rubber gasket that fits into a hole on the stool) a little bit until you get it level, then tighten each bolt down a bit, going back and forth and keeping it level. For our toilet, we needed three points of contact for it to be stable. I don't know if that holds for all toilets or not, but your instructions should tell you.
Once the tank is on, you can attach your hose and fill it up. Give it a good flush or two just to make sure that it works and doesn't leak. If you didn't do your wax rings properly, you might see some water seeping out under the edges of the stool. Now is the time to fix it, so make sure you test it enough that you're confident there are no leaks. Here's what that looks like:
Yay, it works! Just slap the lid on there and you're good to go. Here we are, feeling mighty pleased with ourselves.
But our story isn't done yet! We still need to put a vanity right where I'm sitting. We'll also need a new mirror, since the old one won't fit. Keep that in mind when you do tile, by the way. Your floor height will raise by 1/2-3/4" and anything that fits perfectly probably won't anymore. For us, the vanity sits on top of the tile so it raised by a bit. The mirror used to go from the top of the counter straight to the light fixture, so that doesn't fit anymore. It's okay, we didn't like it anyway. We still have just a few more things to do, but we're very close now. The remaining changes are pretty minor and should go quickly.
Now that's a good-looking bathroom. We're going to remove that towel bar and put some pictures up there, probably in black frames.
We put up hooks for the towels instead of a bar. They take up less space, don't require any folding, and it gives sort of a spa look, I think.
Here's the tile floor, all clean and with the grout dried. Our cat also decided that he needed to make an appearance.
I also swapped in this soap dispenser this morning. I think it looks better in the room than the green one and I really love the style of it overall. Win!
We do have a little more to do. There's some touch-up paint to put up, we want to get a non-tension shower rod installed, we have to put up those pictures, patch some holes, install the baseboards...sounds like more than it feels like, but that's probably just due to our having done so much in there already. As always, I'll keep you all posted on it. Thanks for reading!


I really like the finished bathroom! It looks great and I love the towels hung on hooks, you're right that it looks like a spa. Also love the soap dispenser. Let me know how you like the toilet. By the way, it cost us $150 to put the same toilet in our bathroom (that's what a plumber charged) so you're saving money all over the place!
ReplyDeleteGood job!!! It really looks great. Just remember to put the pretty new toilet seat down after you use it. Jenna will love you for it:>)
ReplyDeleteVery nice. Reminds me of when we replaced the toilet and vanity in our bathroom. We also went with a Toto toilet, but it was a different version--one that's got a push button water saver flusher. And we also had to get a new mirror--mostly because the vanity we got was taller than the previous one, thus making the mirror not fit. I would have gone with a framed mirror, but we couldn't find one we liked so we did the basic sink to light mirror.
ReplyDelete@Peggy - That's cool! We're really liking it. We got a deal on three of them, so they're going in all the bathrooms as we finish them. The previous ones were little round-bowl things that just didn't look great and were getting worn.
ReplyDelete@Monte - Oh yeah, I'm good about that. This one takes a little getting used to, though. It's a soft-close lid so you just get it started and then it slowly eases itself down. Nice because you don't get the accidental drop like with regular ones, but it's tough not to just shove it all the way down.
@Katina - A friend of ours has one of those. I don't think it's a Toto, but it has two buttons on it for different flushes. Very cool idea, for sure.
Hahaha, you're such a woman.
ReplyDelete*secretly takes notes*